Tuesday, May 6, 2008

Tuskineko Ink PostCard challenge

I joined a challenge in the Surface Design Yahoo group that I am in. The post cards were mailed on April 30th, so they should have been received by everyone by now. It was a perfect challenge because I had just received and order of the Tuskineko Ink and I had been reading about using the ink with Aloe Vera gel to thicken it and enable you to keep the ink where you wanted rather than bleeding.

I love to work with Bleeding Heart, it seems to be my interest these last few months, so I used them as my theme for this postcard.

The first thing that I did was find a botanical print of the flower and the shape of the leaves. I practiced drawing the images until I had something I liked, and I drew some 4 X 6 squares on heavy watercolor paper. I drew a few until I thought it was what I wanted and then I cut out the shapes with an exacto knife. I've never really been able to draw so this process took me quite a while.

I thought that I could make the stencil sturdier by painting both sides with white gesso, but that didn't really work, so after it dried, I painted both sides with Mod Podge and that worked well.

In between drying times for the stencil, I painted some fabric with fabric paint, salted it and then let it dry. Put it in the dryer for awhile on high so it was ready to use the next day.


I started by painting the white ink first in the flowers. The white Tuskineko is opaque, so it gave me a good base for the pink flowers. After painting the white, I then thickened some red ink with aloe vera gel and painted over the white on the flowers. Then I took the stencil off and painted the white in the middle and added some shading to the pedals.

There was a darker patch of blue,on the bottom of the fabric, that I used to test out coverage and the colors reaction to the blue.


Next I went to work on the leaves. I laid out 8 postcards on the blue and I was glad I did. I only needed 4 postcards for the trade, but I wanted a few extras to send out. Good thing I did because the leaves were more difficult. In the lower left hand corner you can see the one I experimented with. I first put down white and then went over it with a dark green, to make it worse I forgot to use the aloe vera gel to thicken the ink so you can see how much difference the gel makes, no bleeding. The second leaf on the card I just used the thickened dark green, but i didn't like that either. I tried a yellow on the leaf in the bottom right, but that wasn't the right color, so I put the dark green over the yellow, and it was too dark. Then I mixed some dark green in the yellow and got the shade I wanted.
As you can see at the top of the page, the postcards look much better finished than they did as a sheet. After I finished painting them I cut them out, fused them to some Timtex and did an outline stitch around the flowers and the leaves. I also put some veins in the leaves, give it a much more finished appearance. Now back to finish April's TIF.


Sunday, May 4, 2008

April TIF - Update

My first step for this month's TIF was to paint a background for my project. I first thought I would do 4 - 1/2 tree's to show the changing of the seasons. I tried to change the sky in each area to also reflect the changing of the seasons. My piece wound of being very large and I wasn't quite ready for that, so I took 1/2 of the fabric and cut a tree out of some Sherril Kahn fabric I had. I was going to put lots of branches in but I realized that they would be hidden under the leaves, so I just made some main branches to peek through.


I found some small scale climbing rose fabric in my stash and cut off a large chunk and used my rotary cutter to cube it into smaller pieces. I cut some fusible web in an organic shape and put it over the first two branches, on the left, and heavily sprinkled the fabric over the top. Now I had my Spring.


I did the same thing with some green hand-dyed to get the look of the summer leaves.


I did things a little differently for fall. I had some scraps of a great multi-color fall fabric that I made a shirt for my husband from. Since it already looked like fall leaves, I just cut out small organic shapes of the fabric and fused them down. After I got the three seasons done, I got some fine green tule and fused it down over the spring,summer, fall sections of the quilt. I sprinkled some Bonash powder on the sections to help hold down the tule, but I found in some places I had gotten it too heavy and you can see the shinyness in some of the pictures. Note to self - be very careful how much you use!


I used the last branch for the winter scene. At the after-Christmas sales, I picked up a plastic bag of that snow they use in scenes (like model trains with snow on the village). I tried to glue it down with some foil glue, but that didn't work all that well, so I put sone more glue ove the top of the snow and then coved it with it with a piece of fine white tule. I had some small plastic snow flakes, so I put them between the limb and the ground. See how handy those little bits and piece you pick up here and there are?


This is what is looks like right now, I've got it pinned to do the thread work on and it should be finished early next week, I'll post as soon as it is one.


Sunday, April 13, 2008

April TIF - first post

Well, I have to admit that this challenge is a very hard one for me. If you asked me I would have said that I think change is a glass half full, but....this past year has been full of big changes and a time of personal growth. I'm finally comfortable with the changes of the past year, and my glass is getting a lot fuller. It was hard for me to find the glass anywhere last year, but thanks to my friends and husband I have come out the other side.

So do I try and portray how I felt during the changes of the last year? I still can't figure out how to do that. For me change has always been a time of growth, and I certainly have had a lot of changes most of my life. If I look back the changes have resulted in something good, but they have been often been painful as they happened, even if I decided to make the changes.

The idea the has stuck in my head the most the last few days are the changing seasons. I think I will try and do something along that line. I need to find a way to show the changing seasons without getting too elaborate. I'll post more as I start my project this month.

Monday, March 24, 2008

March TIF


The challenge for this month was to notice small things we often overlook. I love the way the raindrop looks in the center of the Lupin leaf, so that is what I did. I made this project 4 x 6", because the call was for small things.

I want to explore new techniques for each months TIF, so this month I did the same.

I started with a 5 x 7 piece of muslin and I traced the lupin leaves on with a marking pencil. Next I dug out the oil pastels I bought years ago, never used, and colored in the leaves with a green and then a brown, and then in some places a light green. I blended the colors with a small stencil brush. I wasn't that happy with the look, but I went ahead and sewed a dark olive border on all the leaves and then used a light olive for the stem and center.

It looked better, but still not right, the muslin was too plain. I picked up some glitter mist at a rubber stamp show last month, opal, so I sprayed that over the entire postcard. It gave the leaves a soft finish and blended the colors all together.

It didn't do much for the muslin though. I decided to give the muslin an olive wash with translucent fabric paint. Turned out a pale yellow-green, but made the muslin look better, you could even see a little of the glitter mist on the fabric. I spread it over the leaves along with the fabric and it made the piece more cohesive. OK, still kind of bland, I thought about using another color of paint and splotching it on the fabric, but I decided that would be too much. Instead I took a blue prisma color pencil and drew some crosshatched lines, very lightly over the background.

That was better, I got out my heat crystals and placed a blue crystal in the center of each leaf, to show the reflected sky in the drop. I looked at it for a while and decided that it needed something else, so I took some flat green crystals and scattered them on the piece and that was the end.

After all is said and done, this turned out almost as I had pictured it. I am pleased with the result. March hasn't been the best month for me, so I still have to put the postcard on the back, and zigzag the edges of the postcard. When the postcard is completed, I spray a light cover of acrylic sealer over the top. It protects the materials that are not water resistant, and keeps the card a little brighter going through the mail. After I do that I will replace one of the pictures with the totally finished piece. It might take me a little while to get that done, so consider me done with this months TIF. Thank you everyone for your comments on my last months TIF, I will be better at answering you comments this month, and I will blog my project more often. I had decided earlier this month what I wanted to to, but I didn't do anything on the project until this weekend.

Saturday, March 1, 2008

TIF February Finished


I did finish my project this month on time, got in done last night about 6pm. What a relief to be done on time. I've been having allergy attacks the last few weeks, so it was a close thing. New allergy medicine from the Dr. has been helping.

I've named this months TIF "Looking Towards Home"

I downloaded the image of earth and Mars "Courtesy NASA/JPL-Caltech." They have wonderful pictures, and they are free to use as long as you give them credit.


The process I used to make Mars I've documented in the last entry. I used another dark fabric to make Mar's shadow and I appliqued them using a Sulky silver/black metallic thread. I used the plain white dryer sheets for the word Dream, and I couched on some Razzle Dazzle to outline the word.


For Earth, I printed the picture on fabric, cut and appliqued it to the background and also outlined it with couched Razzle Dazzle. For the stars on the background, I lightly sprinkled a fusible powder and ironed silver foil over the powder to get the stars.


I enjoyed this project so much, I'm thinking of doing the whole solar system. Time will tell how much I do, but space has always enthralled me, so time will tell.


I want to thank everyone for their wonderful comments on my last posting. I usually try to answer each one but it didn't happen this time. Thanks everyone, all the TIF participants inspire me.


Sunday, February 17, 2008

Update 2 Febuary TIF

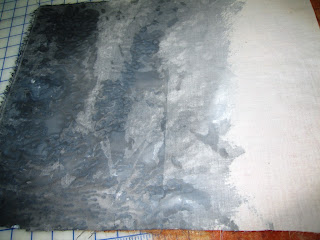
Well this months challenge is turning into a lot of fun. Last week after I posted and went in and setup my cutting table for painting. I mixed up a very dark gray to start and painted the bottom of my muslin. The size I started out with was approximately 14 x 20". Then I added more white and painted up a little higher, added more white and so on. After I painted about 1/2 of the fabric I threw some kosher salt and let it sit over night. I forgot to take a picture of that part by itself, but I got the back so you can get an idea of what it looked like. Also in some of the other pictures you see part of the bottom.


Then I spent a couple of days thinking about how to get the red part of Mars. when I first thought about doing the project, I was planning on using painted and distressed tyvek for the red part, but in a comment last week from MixPix (thanks so much) I got a site that had picture of Mars. I knew that the tyvek would be too hard to give the effect I wanted, so I decided to paint up a group of old dryer sheets.
For those not familiar with using dryer sheets (the white ones) after you use them, save them up and when you have a bunch, put them in a small mesh bag (I use a bra bag), throw them in the wash with your clothes and then in the dryer. I usually give them a quick press with the iron on low heat and then store them in a plastic bag till I want to use some. They paint up with regular fabric paint or watered acrylic paint. I usually use a spray bottle to apply the paint. I used a russet and then also mixed up a blend of raw sienna and yellow for some others. I didn't want the sheets to be uniform so on some of them I sprinkled some salt to see what the effect would be. On a couple I used a few splotches of a metallic copper or bronze to give more texture. You can see how adding different layers over each other changes the color of a section.


I started to lay out the dryer sheets on the top of the shaded muslin that I had painted earlier. I found that I had to tear the edges of the dryer sheets so that there would not be a straight line where the sheets covered each other or were on the top of the stack. As you can see in this picture I did cover some of the shaded gray areas so that the gray would show through in various sections. I also took the shreds of the dryer sheets that I had pulled off to make the edges ragged and just randomly placed them on the red sections. When I was pleased with the color and coverage of the dryer sheets, I sprinkled some BoNash powder under the sheets and fused everything down to the muslin. The dryer sheets are so sheer that I didn't need to put it beween each layer.
Then I got brave and decided to cut Mars out of the base fabric. After I cut out the circle, which has an approximate 12" diameter, I really got excited. I don't think there is anything better that having an idea turn out just the way you invisioned it. I've still got a little more work on the planet itself, and then I need to finish the rest of the piece, but here is my Mars! This has really been a fun challenge this month.


Here is a picture of Mars that I downloaded off the Hubble site, just so you can see what the original looks like.
For my friends that read my blog, that are interested in seeing the more prosaic projects I am working on and done this past year, I'm going to start another blog, with just regular projects. You can find this blog at

http://megabqprojects.blogspot.com/


Thursday, February 7, 2008

February TIF Challenge

We have quite a challenge this month. The challenge is on Sharon B's website if you want to read the whole thing.
http://sharonb.wordpress.com/2008/02/01/take-it-further-challenge-february/

Otherwise she summarized the whole thing below.

"So this month stop and think what are you old enough to remember. You do not have to declare your age - but simply what you are old enough to remember."

The color pallet for this month is also shown.


My first thought was that this would be an easy challenge. So I started to list in my head what I remembered: Polio, a friend of my Dad's going off to Korea, the presidential campaign in 60 with talk of the Pope running the White House, the Bay of Pigs, air raid drills, assassination of JFK; Vietnam war and being stationed at Bethesda Naval Hospital.

Well, I decided that I didn't want to make a political statement with my memories, but those where the first memories that came to me. So what are some good memories, going to the 1964 worlds fair with my mother, the race to the moon, the first man in space, walking on the moon, I seem to remember that the possibilities of the future felt better than the present. I've always tried to live in the present, put the past where it belongs, and dream about the future.

So, I'm going to do something about space, I've always thought it would be wonderful to be able to go into space, take a vacation on the moon. The last few years Mars has caught my attention. OK, I'm going to do something that features Mars - I'm going to use some tyvek in my piece - that's something new, then I'm going to put in something old too!

Well, I've got to go paint some tyvek and fabric for this challenge, more later!

PS: I also made some postcards for the first time, for a Valentine Swap, I'll post them in the next day or two, as soon as I pull them off the camera.